
Ginger Sandwich
21 December 2025

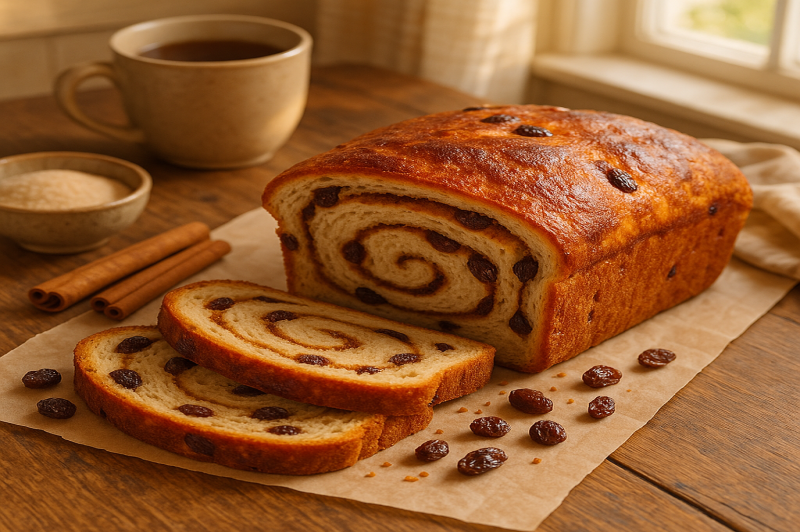
For one thing, this recipe is just way better than any store-bought bread. The homemade loaf has an unimaginably delicious flavor and texture. No manufacturer could rival it. Sensuous notes are present in the bread itself because of those warm, mellow tastes of milk and butter, while the filling mixture with cinnamon and sugar imparts sweetness enrobed in aromatics that is well-served by the juicy raisins. This is a mellow specialty suitable for every time of day--as a morning toast for example, or even as an after-school snack or a simple dessert.
What sets this recipe apart is its simplicity. It is the perfect entry-level recipe for baking bread. We use instant yeast, which is so much easier than active dry yeast and means you don’t have to proof it separately. The process of kneading the dough can be a deeply therapeutic experience, but if you have a stand mixer, it can help you do the heavy lifting. To see this dough rising, and then rolling it up into a beautiful swirl, is really very satisfying. This is not just a recipe; it is also a warm memory in the making and a wonderful way to make delicious bread.
Getting your cinnamon raisin bread together is easy. It’s the sort of thing that needs no fuss, but ending it requires determination.
Making your roll dough starts with having a good base. In a large bowl or the bowl of a stand mixer, pour the warm milk and melted butter, add in the egg and granulated sugar. Warm milk according to touch, same as a baby's bottle, not hot. If it is too hot it will kill the yeast; if too cold (below 42°C), the yeast will not become active properly. Whisk only until most of the sugar is dissolved. Once this has been done, sprinkle the instant yeast over the top of your liquid mixture. There is no need to stir it in or wait for it to froth like with active dry; it will activate itself as you mix ingredients together.
Once the dough is well blended, take some of it and form a ball. Set aside until it is needed, at least 15 minutes later. As per the instructions in the recipe, add 3 cups all-purpose flour to the bowl. Add two teaspoons of salt. You can now attach the dough hook if you are using a stand mixer. Mix at low speed until the dough begins to form sticky bread dough. You may need to stop and scrape down the sides of the bowl once or twice. Once the ingredients are combined, add the raisins and continue to mix on low until they are evenly distributed throughout the dough. The raisins might seem as if they are tearing the dough a bit, but this is perfectly normal, don't worry about it.
Using a Stand Mixer: Increase the speed to medium-low and knead dough for 5-7 minutes. The dough needs to go from a sticky mess in your bowl into a smooth, elastic ball. If you stop the machine when everything is pulled away and nothing sticks to your finger, the texture is slightly tacky, then it is ready. Add more flour for kneading later, as needed but it should be in moderation only. More flour makes the bread dense. By Hand: Lightly dust the surface of a clean work area and turn out the dough. At first, it's sticky. Knead by pushing the dough away from you with the heel of your hand, giving it a quarter turn and folding it over. Keep doing this action for at least eight to ten minutes. Resist the urge to add too much extra flour - a little for dusting your hands and the countertop is fine, but adding too much will make the bread dense. You'll know it's ready when the dough is smooth, elastic, and springs back slowly when poked.
Oil or coat a large, clean bowl. Make your kneaded dough into a smooth ball and put it in the bowl, turning it once so that the top is oiled. This process prevents the formation of a dry crust. Cover the bowl tightly with plastic wrap, or just put a wet kitchen towel over it. Place it in a warm, draft-free corner of your kitchen to rise for 1 to 1.5 hours so that the dough has doubled in volume. A good place would be near a sunny window or on top of the fridge or in an oven that has been turned off but its light is still on.
While the dough is rising, make the delicious cinnamon-sugar filling. In a small bowl, whisk together the softened butter, light brown sugar, grounds of cinnamon, and a tablespoon of flour to make the mixture smooth. The flour helps stop leakage of liquid from the filling. You get everything mixed together as a thick spreadable paste.
Once the dough has doubled, gently punch it down to release air. Turn it onto a lightly floured surface and gently press it into a rectangle about 10x14 inches. Now spread the cinnamon filling evenly on top of the dough, leaving a clear ½-inch border along one long side.
From the clean border, roll the dough tightly into a log. The tight roll is what is instrumental for that stunning swirl without big gaps. The seam (clean border that you left) should be pinched very firmly into the log to seal it. Also, pinch the ends of the log closed and tuck them under.
Butter or spray with cooking oil a 9x5-inch loaf pan. Carefully put the shaped log into the pan, seam side down. The dish should then be tightly covered either with plastic wrap or a towel that has been dipped in water and squeezed out. Place in a warm place to rise again, for about 45-60 minutes, or until the dough has risen almost 1 inch above the rim of the pan. About 20 minutes before it is finished rising, preheat your oven to 350°F (175°C).
Put the loaf pan in the preheated oven on the center rack. Bake for 30-35 minutes. You will know it's finished when the top is a deep golden brown and an instant-read thermometer shows 190°F (88°C) internally. If you don't have a thermometer, you can tap on top of the loaf gently: it should sound hollow. If the top is browning too quickly, you can put a tent of foil over it—not too tight—for the last 10 minutes of baking.
Take the bread out of the oven and let it cool in the pan for about 10 minutes. Then, carefully turn it out onto a wire rack to cool completely. This step is important! Although it's tempting to cut into a hot loaf, this can make it gummy. Allowing it to cool completely lets the internal structure set properly. When cold, slice with a serrated knife and eat.
One of the best things about this bread is how well it keeps. To store the bread, let the loaf cool completely. You can then put it into a bread bag or an airtight container. It will keep at room temperature for 4–5 days. Don’t put it in the refrigerator, or it will go bad more quickly. The great thing about this bread is that it freezes beautifully. Either the whole loaf or–for convenience–slice it first; wrap the loaf in plastic wrap or the sliced pieces in a freezer-safe bag. It will keep for up to three months in your freezer. When you feel like having some, just take out a slice and put it straight into your toaster. On those hectic mornings, there is nothing better than a warm, toasted slice of cinnamon raisin bread!
So there you have it–a simple and inspiring recipe to make your own Cinnamon Raisin Bread at home. Producing this bread is as enjoyable as the result to eat; baking it fills one's home with an incredible aroma and makes it feel just a bit more like you've accomplished something. We encourage you to give it a try, and don't hesitate to adapt the recipe to suit yourself. Please post your results in the comments below.

Hello, We’re content writer who is fascinated by content fashion, celebrity and lifestyle. We helps clients bring the right content to the right people.


We must explain to you how all seds this mistakens idea off denouncing pleasures and praising pain was born and I will give you a completed accounts..
Consultation
Showing 0 verified guest comments